

How To Run Cmake On Windows
Testing With CMake and CTest
Testing is a key tool for producing and maintaining robust, valid software. This chapter will examine the tools that are part of CMake to support software testing. We will begin with a brief discussion of testing approaches, and then discuss how to add together tests to your software projection using CMake.
The tests for a software parcel may have a number of forms. At the most basic level there are smoke tests, such equally one that simply verifies that the software compiles. While this may seem like a simple test, with the broad diverseness of platforms and configurations available, smoke tests catch more bug than any other type of exam. Some other class of smoke test is to verify that a test runs without crashing. This can be handy for situations where the programmer does not desire to spend the fourth dimension creating more circuitous tests, merely is willing to run some simple tests. Most of the time these simple tests tin be small example programs. Running them verifies not merely that the build was successful, but that any required shared libraries can be loaded (for projects that use them), and that at least some of the lawmaking can be executed without crashing.
Moving across bones smoke tests leads to more than specific tests such as regression, black-, and white-box testing. Each of these has its strengths. Regression testing verifies that the results of a test practise not change over time or platform. This is very useful when performed frequently, equally it provides a quick check that the beliefs and results of the software have not inverse. When a regression examination fails, a quick look at contempo lawmaking changes can usually identify the culprit. Unfortunately, regression tests typically require more effort to create than other tests.
White- and black-box testing refer to tests written to exercise units of code (at diverse levels of integration), with and without cognition of how those units are implemented respectively. White-box testing is designed to stress potential failure points in the lawmaking knowing how that lawmaking was written, and hence its weaknesses. As with regression testing, this can take a substantial amount of attempt to create skilful tests. Blackness-box testing typically knows lilliputian or zip almost the implementation of the software other than its public API. Black-box testing can provide a lot of code coverage without too much endeavour in developing the tests. This is especially true for libraries of object oriented software where the APIs are well divers. A black-box exam can exist written to become through and invoke a number of typical methods on all the classes in the software.
The final type of testing we volition hash out is software standard compliance testing. While the other exam types we accept discussed are focused on determining if the code works properly, compliance testing tries to determine if the code adheres to the coding standards of the software project. This could be a check to verify that all classes have implemented some key method, or that all functions have a common prefix. The options for this type of test are limitless and at that place are a number of ways to perform such testing. There are software analysis tools that can be used, or specialized examination programs (maybe python scripts etc) could be written. The key point to realize is that the tests do non necessarily take to involve running some part of the software. The tests might run some other tool on the source code itself.
There are a number of reasons why it helps to accept testing support integrated into the build process. Start, complex software projects may take a number of configuration or platform-dependent options. The build system knows what options can be enabled and can then enable the appropriate tests for those options. For case, the Visualization Toolkit (VTK) includes support for a parallel processing library called MPI. If VTK is built with MPI support then additional tests are enabled that brand use of MPI and verify that the MPI-specific lawmaking in VTK works equally expected. Secondly, the build organisation knows where the executables will be placed, and information technology has tools for finding other required executables (such as perl, python etc). The third reason is that with UNIX Makefiles information technology is mutual to accept a test target in the Makefile so that developers tin type brand exam and have the exam(s) run. In society for this to work, the build system must have some cognition of the testing procedure.
How Does CMake Facilitate Testing?
CMake facilitates testing your software through special testing commands and the CTest executable. Kickoff, we volition discuss the primal testing commands in CMake. To add testing to a CMake-based project, but include(CTest) and use the add_test command. The add_test command has a simple syntax as follows:
add_test(Proper name TestName COMMAND ExecutableToRun arg1 arg2 ...) The get-go argument is simply a string name for the test. This is the name that volition exist displayed by testing programs. The second argument is the executable to run. The executable tin can exist congenital every bit part of the project or it tin can be a standalone executable such as python, perl, etc. The remaining arguments will be passed to the running executable. A typical example of testing using the add_test command would expect like this:
add_executable(TestInstantiator TestInstantiator.cxx) target_link_libraries(TestInstantiator vtkCommon) add_test(Proper name TestInstantiator Control TestInstantiator) The add_test control is typically placed in the CMakeLists file for the directory that has the exam in it. For large projects, there may exist multiple CMakeLists files with add_test commands in them. One time the add_test commands are present in the project, the user can run the tests by invoking the "test" target of Makefile, or the RUN_TESTS target of Visual Studio or Xcode. An example of running tests on the CMake tests using the Makefile generator on Linux would exist:
$ make test Running tests... Exam project First two: kwsys.testEncode 1/20 Test #two: kwsys.testEncode .......... Passed 0.02 sec Start iii: kwsys.testTerminal 2/20 Examination #3: kwsys.testTerminal ........ Passed 0.02 sec Start 4: kwsys.testAutoPtr iii/20 Test #4: kwsys.testAutoPtr ......... Passed 0.02 sec Additional Exam Properties
By default a examination passes if all of the following conditions are true:
-
The test executable was found
-
The test ran without exception
-
The test exited with return code 0
That said, these behaviors can exist modified using the set_property control:
set_property(Examination test_name Property prop1 value1 value2 ...) This command will set additional properties for the specified tests. Example properties are:
-
Environment -
Specifies surround variables that should be defined for running a examination. If set to a list of environment variables and values of the form
MYVAR=value, those environment variables will exist divers while the test is running. The environment is restored to its previous country after the test is done. -
LABELS -
Specifies a list of text labels associated with a test. These labels can be used to grouping tests together based on what they examination. For example, you lot could add together a label of MPI to all tests that practise MPI code.
-
WILL_FAIL -
If this option is gear up to true, and then the test will pass if the render code is non 0, and fail if it is. This reverses the third condition of the pass requirements.
-
PASS_REGULAR_EXPRESSION -
If this selection is specified, and so the output of the test is checked confronting the regular expression provided (a listing of regular expressions may be passed in likewise). If none of the regular expressions friction match, and then the test volition neglect. If at least one of them matches, and then the test volition pass.
-
FAIL_REGULAR_EXPRESSION -
If this option is specified, and then the output of the exam is checked against the regular expression provided (a listing of regular expressions may be passed in every bit well). If none of the regular expressions match, then the test will pass. If at least one of them matches, so the exam volition fail.
If both PASS_REGULAR_EXPRESSION and FAIL_REGULAR_EXPRESSION are specified, and so the FAIL_REGULAR_EXPRESSION takes precedence. The following example illustrates using the PASS_REGULAR_EXPRESSION and FAIL_REGULAR_EXPRESSION :
add_test (Proper noun outputTest Control outputTest) set (passRegex "^Examination passed" "^All ok") set (failRegex "Error" "Fail") set_property (TEST outputTest PROPERTY PASS_REGULAR_EXPRESSION "${passRegex}") set_property (TEST outputTest Property FAIL_REGULAR_EXPRESSION "${failRegex}") Testing Using CTest
When yous run the tests from your build environment, what really happens is that the build environment runs CTest . CTest is an executable that comes with CMake; information technology handles running the tests for the projection. While CTest works well with CMake, you practise not take to employ CMake in order to employ CTest. The main input file for CTest is called CTestTestfile.cmake . This file will exist created in each directory that was candy by CMake (typically every directory with a CMakeLists file). The syntax of CTestTestfile.cmake is like the regular CMake syntax, with a subset of the commands available. If CMake is used to generate testing files, they volition list any subdirectories that demand to be processed as well equally any add_test calls. The subdirectories are those that were added by the add_subdirectory commands. CTest can and then parse these files to determine what tests to run. An example of such a file is shown beneath:
# CMake generated Testfile for # Source directory: C:/CMake # Build directory: C:/CMakeBin # # This file includes the relevent testing commands required # for testing this directory and lists subdirectories to # be tested as well. add_test (SystemInformationNew ...) add_subdirectory (Source/kwsys) add_subdirectory (Utilities/cmzlib) ... When CTest parses the CTestTestfile.cmake files, it will extract the list of tests from them. These tests will be run, and for each test CTest will brandish the proper name of the examination and its status. Consider the following sample output:
$ ctest Test projection C:/CMake-build26 Start one: SystemInformationNew 1/21 Exam #1: SystemInformationNew ...... Passed 5.78 sec Start 2: kwsys.testEncode 2/21 Test #2: kwsys.testEncode .......... Passed 0.02 sec Start 3: kwsys.testTerminal 3/21 Test #three: kwsys.testTerminal ........ Passed 0.00 sec Start four: kwsys.testAutoPtr 4/21 Test #4: kwsys.testAutoPtr ......... Passed 0.02 sec Start v: kwsys.testHashSTL 5/21 Exam #v: kwsys.testHashSTL ......... Passed 0.02 sec ... 100% tests passed, 0 tests failed out of 21 Total Test time (real) = 59.22 sec CTest is run from inside your build tree. It will run all the tests institute in the current directory likewise equally whatsoever subdirectories listed in the CTestTestfile.cmake . For each test that is run CTest will report if the test passed and how long it took to run the test.
The CTest executable includes some handy command line options to brand testing a little easier. We will commencement past looking at the options yous would typically apply from the control line.
-R <regex> Run tests matching regular expression -Eastward <regex> Exclude tests matching regular expression -L <regex> Run tests with labels matching the regex -LE <regex> Run tests with labels not matching regexp -C <config> Cull the configuration to test -V,--verbose Enable verbose output from tests. -N,--evidence-merely Disable actual execution of tests. -I [Kickoff,Stop,Stride,test#,test#|Test file] Run specific tests past range and number. -H Display a help message The -R choice is probably the most commonly used. It allows you to specify a regular expression; only the tests with names matching the regular expression will exist run. Using the -R selection with the name (or part of the name) of a test is a quick style to run a unmarried test. The -Due east selection is similar except that information technology excludes all tests matching the regular expression. The -Fifty and -LE options are like to -R and -E , except that they utilize to exam labels that were gear up using the set_property command described previously. The -C option is mainly for IDE builds where you might have multiple configurations, such as Release and Debug in the aforementioned tree. The argument following the -C determines which configuration will be tested. The -5 argument is useful when you are trying to determine why a test is declining. With -Five , CTest will print out the control line used to run the examination, also as any output from the exam itself. The -V option can be used with whatsoever invocation of CTest to provide more verbose output. The -Northward option is useful if yous want to come across what tests CTest would run without actually running them.
Running the tests and making sure they all pass before committing any changes to the software is a certain-fire mode to improve your software quality and development procedure. Unfortunately, for large projects the number of tests and the fourth dimension required to run them may be prohibitive. In these situations the -I selection of CTest tin be used. The -I selection allows you to flexibly specify a subset of the tests to run. For example, the post-obit invocation of CTest will run every seventh test.
While this is not as proficient every bit running every test, it is better than not running any and it may be a more applied solution for many developers. Note that if the showtime and cease arguments are not specified, as in this example, and so they will default to the first and last tests. In another example, assume that you e'er want to run a few tests plus a subset of the others. In this example y'all can explicitly add those tests to the cease of the arguments for -I . For example:
volition run tests 1, two, iii, and 10, plus every fifth exam. You tin pass as many test numbers equally you want after the stride argument.
Using CTest to Drive Complex Tests
Sometimes to properly test a project you need to actually compile lawmaking during the testing stage. In that location are several reasons for this. First, if test programs are compiled every bit office of the principal project, they can end upwardly taking up a pregnant corporeality of the build time. Also, if a test fails to build, the main build should not fail also. Finally, IDE projects can quickly become too large to load and work with. The CTest command supports a group of command line options that allow it to exist used every bit the test executable to run. When used every bit the examination executable, CTest can run CMake, run the compile step, and finally run a compiled exam. We will now look at the command line options to CTest that support building and running tests.
--build-and-test src_directory build_directory Run cmake on the given source directory using the specified build directory. --test-command Name of the program to run. --build-target Specify a specific target to build. --build-nocmake Run the build without running cmake outset. --build-run-dir Specify directory to run programs from. --build-two-config Run cmake twice before the build. --build-exe-dir Specify the directory for the executable. --build-generator Specify the generator to use. --build-projection Specify the name of the project to build. --build-makeprogram Specify the make plan to use. --build-noclean Skip the make clean pace. --build-options Add extra options to the build step. For an example, consider the following add_test command taken from the CMakeLists.txt file of CMake itself. Information technology shows how CTest can be used both to compile and run a test.
add_test(unproblematic ${CMAKE_CTEST_COMMAND} --build-and-test "${CMAKE_SOURCE_DIR}/Tests/Simple" "${CMAKE_BINARY_DIR}/Tests/Uncomplicated" --build-generator ${CMAKE_GENERATOR} --build-makeprogram ${CMAKE_MAKE_PROGRAM} --build-projection Simple --test-command simple) In this example, the add_test control is first passed the name of the test, "simple". Later on the proper name of the test, the control to exist run is specified. In this case, the examination command to exist run is CTest. The CTest control is referenced via the CMAKE_CTEST_COMMAND variable. This variable is always prepare by CMake to the CTest control that came from the CMake installation used to build the project. Adjacent, the source and binary directories are specified. The side by side options to CTest are the --build-generator and --build-makeprogram options. These are specified using the CMake variables CMAKE_MAKE_PROGRAM and CMAKE_GENERATOR . Both CMAKE_MAKE_PROGRAM and CMAKE_GENERATOR are divers past CMake. This is an important step as it makes sure that the aforementioned generator is used for building the exam every bit was used for building the projection itself. The --build-project choice is passed Uncomplicated , which corresponds to the project command used in the Elementary test. The terminal argument is the --examination-command which tells CTest the control to run once it gets a successful build, and should exist the name of the executable that will be compiled by the test.
Handling a Large Number of Tests
When a big number of tests be in a single project, it is cumbersome to have private executables available for each exam. That said, the developer of the project should non be required to create tests with complex argument parsing. This is why CMake provides a convenience command for creating a test driver program. This command is called create_test_sourcelist . A test commuter is a program that links together many small tests into a single executable. This is useful when edifice static executables with large libraries to compress the total required size. The signature for create_test_sourcelist is as follows:
create_test_sourcelist (SourceListName DriverName test1 test2 test3 EXTRA_INCLUDE include.h Role part ) The start statement is the variable which volition incorporate the list of source files that must be compiled to make the test executable. The DriverName is the name of the test driver program (e.g. the name of the resulting executable). The rest of the arguments consist of a list of test source files. Each test source file should accept a office in it that has the same proper name as the file with no extension ( foo.cxx should have int foo(argc, argv); ). The resulting executable will be able to invoke each of the tests past name on the command line. The EXTRA_INCLUDE and FUNCTION arguments back up additional customization of the test commuter program. Consider the following CMakeLists file fragment to run across how this command tin be used:
# create the testing file and listing of tests create_test_sourcelist (Tests CommonCxxTests.cxx ObjectFactory.cxx otherArrays.cxx otherEmptyCell.cxx TestSmartPointer.cxx SystemInformation.cxx ... ) # add together the executable add_executable (CommonCxxTests ${Tests}) # remove the test driver source file set (TestsToRun ${Tests}) remove (TestsToRun CommonCxxTests.cxx) # Add together all the ADD_TEST for each exam foreach (test ${TestsToRun}) get_filename_component (TName ${test} NAME_WE) add_test (Proper name ${TName} Command CommonCxxTests ${TName}) endforeach () The create_test_sourcelist command is invoked to create a test commuter. In this case it creates and writes CommonCxxTests.cxx into the binary tree of the project, using the rest of the arguments to determine its contents. Next, the add_executable command is used to add that executable to the build. So a new variable called TestsToRun is created with an initial value of the sources required for the test driver. The remove command is used to remove the commuter plan itself from the listing. Then, a foreach command is used to loop over the remaining sources. For each source, its proper noun without a file extension is extracted and put in the variable TName , then a new test is added for TName . The terminate consequence is that for each source file in the create_test_sourcelist an add_test command is called with the name of the test. As more tests are added to the create_test_sourcelist command, the foreach loop will automatically telephone call add_test for each one.
Managing Examination Information
In addition to handling big numbers of tests, CMake contains a organisation for managing exam data. It is encapsulated in an ExternalData CMake module, downloads big data on an as-needed ground, retains version information, and allows distributed storage.
The blueprint of the ExternalData follows that of distributed version control systems using hash-based file identifiers and object stores, but information technology also takes advantage of the presence of a dependency-based build system. The figure below illustrates the approach. Source trees contain lighweight "content links" referencing data in remote storage past hashes of their content. The ExternalData module produces build rules to download the data to local stores and reference them from build trees by symbolic links (copies on Windows).
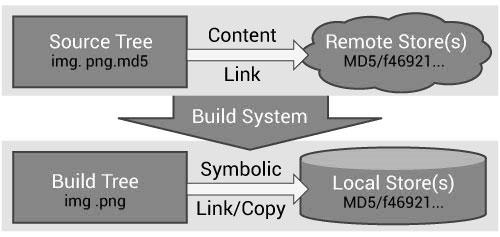
Figure ane: ExternalData module menstruum nautical chart 
A content link is a small, evidently text file containing a hash of the real information. Its name is the same as its data file, with an additional extension identifying the hash algorithm e.thou. img.png.md5. Content links ever take the same (small) amount of space in the source tree regardless of the real data size. The CMakeLists.txt CMake configuration files refer to data using a DATA{} syntax within calls to the ExternalData module API. For example, Data{img.png} tells the ExternalData module to make img.png bachelor in the build tree even if only a img.png.md5 content link appears in the source tree.
The ExternalData module implements a flexible system to prevent duplication of content fetching and storage. Objects are retrieved from a listing of (possibly redundant) local and remote locations specified in the ExternalData CMake configuration equally a list of "URL templates". The merely requirement of remote storage systems is the power to fetch from a URL that locates content through specification of the hash algorithm and hash value. Local or networked file systems, an Apache FTP server or a Midas server , for case, all have this capability. Each URL template has %(algo) and %(hash) placeholders for ExternalData to replace with values from a content link.
A persistent local object store tin can cache downloaded content to share among build copse by setting the ExternalData_OBJECT_STORES CMake build configuration variable. This is helpful to de-duplicate content for multiple build trees. It also resolves an important pragmatic concern in a regression testing context; when many machines simultaneously first a nightly dashboard build, they can utilize their local object store instead of overloading the data servers and flooding network traffic.
Retrieval is integrated with a dependency-based build arrangement, and then resources are fetched only when needed. For example, if the system is used to retrieve testing information and BUILD_TESTING is OFF, the data are non retrieved unnecessarily. When the source tree is updated and a content link changes, the build arrangement fetches the new data every bit needed.
Since all references leaving the source tree get through hashes, they practise not depend on any external country. Remote and local object stores can be relocated without invalidating content links in older versions of the source code. Content links within a source tree tin be relocated or renamed without modifying the object stores. Duplicate content links tin exist in a source tree, only download volition but occur one time. Multiple versions of data with the same source tree file proper name in a project's history are uniquely identified in the object stores.
Hash-based systems allow the use of untrusted connections to remote resources considering downloaded content is verified subsequently information technology is retrieved. Configuration of the URL templates list improves robustness by allowing multiple redundant remote storage resources. Storage resource tin can too change over time on an as-needed basis. If a project's remote storage moves over fourth dimension, a build of older source lawmaking versions is always possible by adjusting the URL templates configured for the build tree or by manually populating a local object store.
A simple application of the ExternalData module looks similar the following:
include(ExternalData) gear up(midas "http://midas.kitware.com/MyProject") # Add together standard remote object stores to user'due south # configuration. list(APPEND ExternalData_URL_TEMPLATES "${midas}?algorithm=%(algo)&hash=%(hash)" "ftp://myproject.org/files/%(algo)/%(hash)" ) # Add a test referencing data. ExternalData_Add_Test(MyProjectData NAME SmoothingTest COMMAND SmoothingExe DATA{Input/Image.png} SmoothedImage.png ) # Add a build target to populate the real data. ExternalData_Add_Target(MyProjectData) The ExternalData_Add_Test function is a wrapper effectually CMake'due south add_test command. The source tree is probed for a Input/Prototype.png.md5 content link containing the information'south MD5 hash. After checking the local object shop, a request is made sequentially to each URL in the ExternalData_URL_TEMPLATES list with the data's hash. Once found, a symlink is created in the build tree. The Information{Input/Epitome.png} path will expand to the build tree path in the test command line. Data are retrieved when the MyProjectData target is built.
Source: https://cmake.org/cmake/help/book/mastering-cmake/chapter/Testing%20With%20CMake%20and%20CTest.html
Posted by: villanots1956.blogspot.com
0 Response to "How To Run Cmake On Windows"
Post a Comment